

The next segment of this Basic VRAY SketchUp tutorial focuses in introducing Nomeradona's approach with material. This is just the beginning overview. There will be more sub-topics coming soon.
If you missed the previous segment be sure to read them first.
Basic VRAY SketchUp Tutorial Series 1
Basic VRAY SketchUp Tutorial Series 2
Ok let's start!
1. The VRAY Material Editor
The icon for the material editor is the firs one "M".

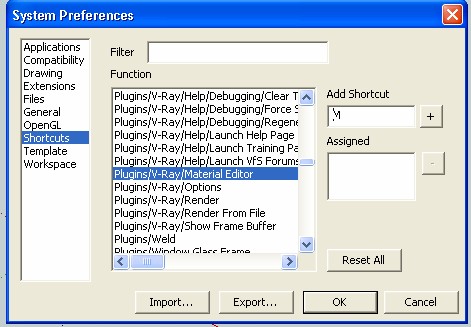
2. Adding keyboard shortcut
I love putting my shortcuts in SketchUp. I also assigned "m" for my VRAY material editor. If you want to create your own keyboard shortcuts, go to system preference. (see image below). This is a very good time saver. Once the shortcut has been assigned, you can automatically open the VRAY Material editor using the keyboard shortcut (in my case, I assigned "m").
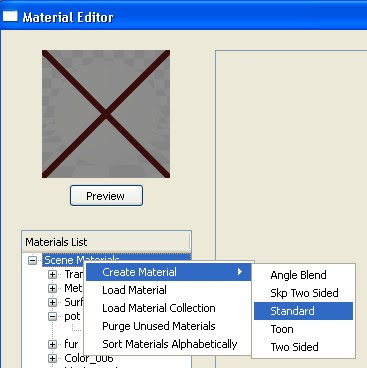
Creating New VRAY Standard Material
If you apply the material in SketchUp, VRAY will automatically create a VRAY material. You can also create and load vismat materials. In this segment let me concentrate in doing a new "standard" material (other materials will be tackled in other tutorials). To create a VRAY Standard material, all you need is to highlight "Scene Material" then right click mouse (another tab will appear). Highlight create and again you will have 5 different types of materials (angle blend, SKp two sided, standard, toon and two sided). Click Standard.
Once standard material was clicked, this new material will be created. You will notice Vray will stack in the very last and name it "Default Material". This default material will have three properties (diffuse, options and maps)

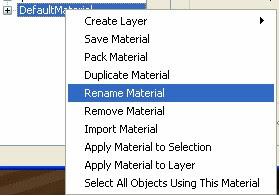
3. Renaming your VRAY Material
Renaming material is pretty simple. Highlight the material you want to rename and right click mouse. Click rename material and type the desired name.
Note: Using the same approach, you can save, pack, duplicate, remove, import, apply or even select all objects that use the material.
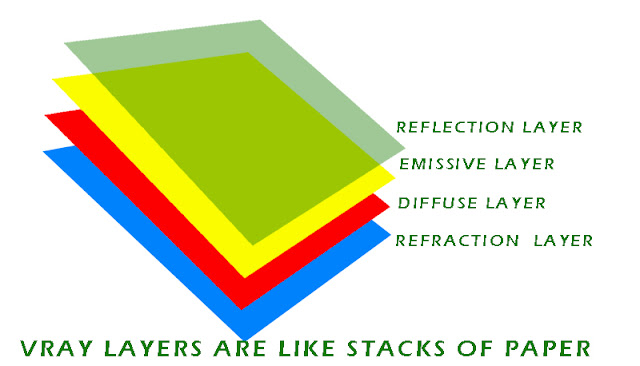
4. VRAY Layers
Each VRAY MATERIAL does not only have properties, but can have also different layers. Vray layers are like stacks of paper or transparencies on top of each other. This understanding must be noted as early as possible. The reflection layer is like a varnish that you apply on top of the stacks. You can apply as many layers as you wish. In this tutorial, I wont talk about UV and I want to do a separate tutorial just for this subject.
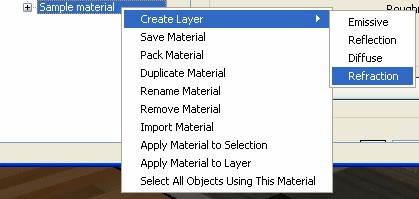
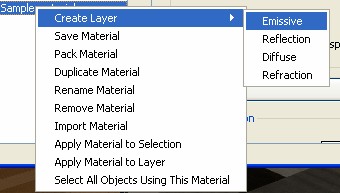
5. Creating VRAY Layers.
To create Vray Layer, you need to highlight the material you want to add layer. Right Mouse click then highlight create layer. Four layer types (emissive, reflection, diffuse and refraction) can be selected.
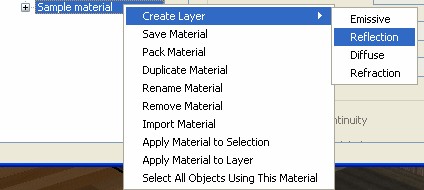
The Reflection Layer

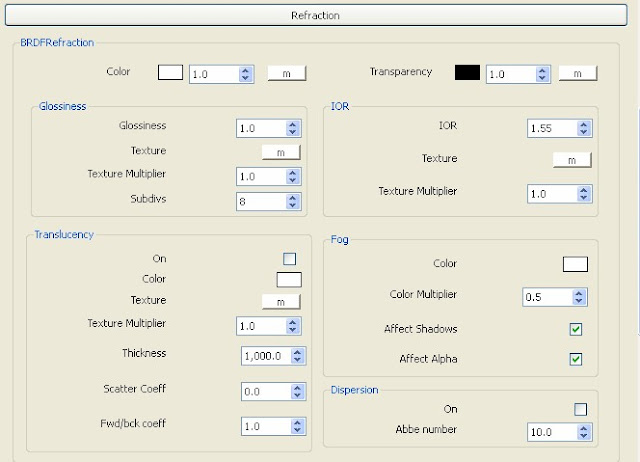
Refraction Layer
Emisive Layer (self emitting layer material)

6. Removing Layer
To remove layer, all you have to do is to highlight the layer, right click mouse and select Remove Layer.

You can also add as many layers as you want. For advance materials, usually you can play with two different reflection materials, or two different diffuse materials. You can also change the position of this layer by moving the layer above or below the stacks.

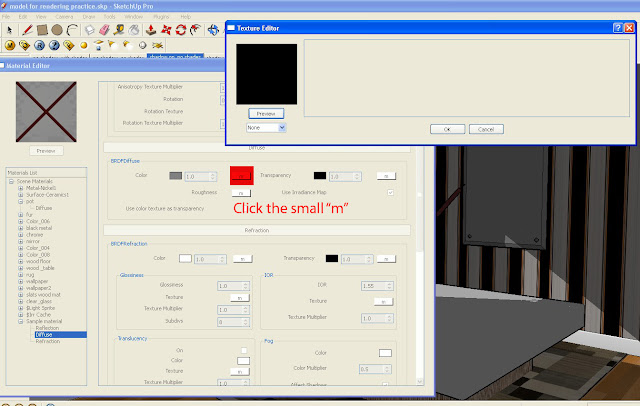
7. Adding/loading Maps
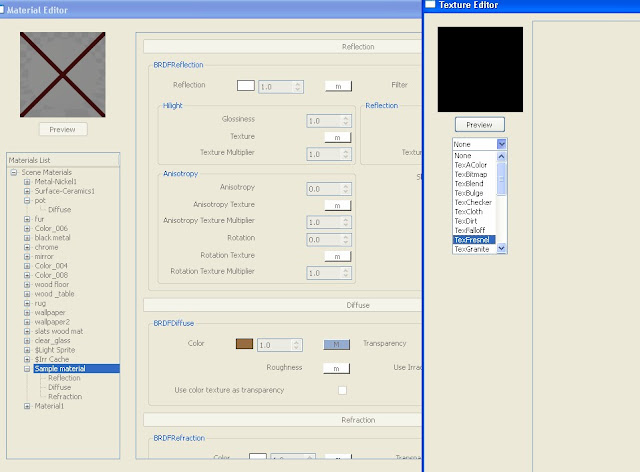
Once you see a small "m"in any box, this indicates that you can load a texture map here. If a capital "M" is showing in this box, this means a texture map of any type is applied. To apply or load a texture map, simply click the small 'm'. In the particular example below, I clicked the "m" in the diffuse layer. Once clicked, a new tab will appear. The small square window is the preview window. This is a very useful tool to preview the material. Under it is a small scroll window where you can load the different texture map types. On the right is the property window that display the different properties that can affect this texture map.
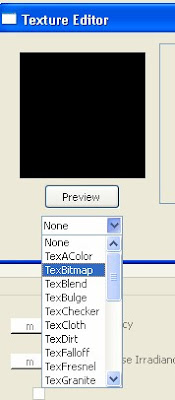
8. Texture Map Types
There are different map types that you can load here: TexAColor, TexBitmap, Texblend etc. Let us use the the common one the "TexBitmap".
Note: All other Map types are procedural maps except the TexBitmap
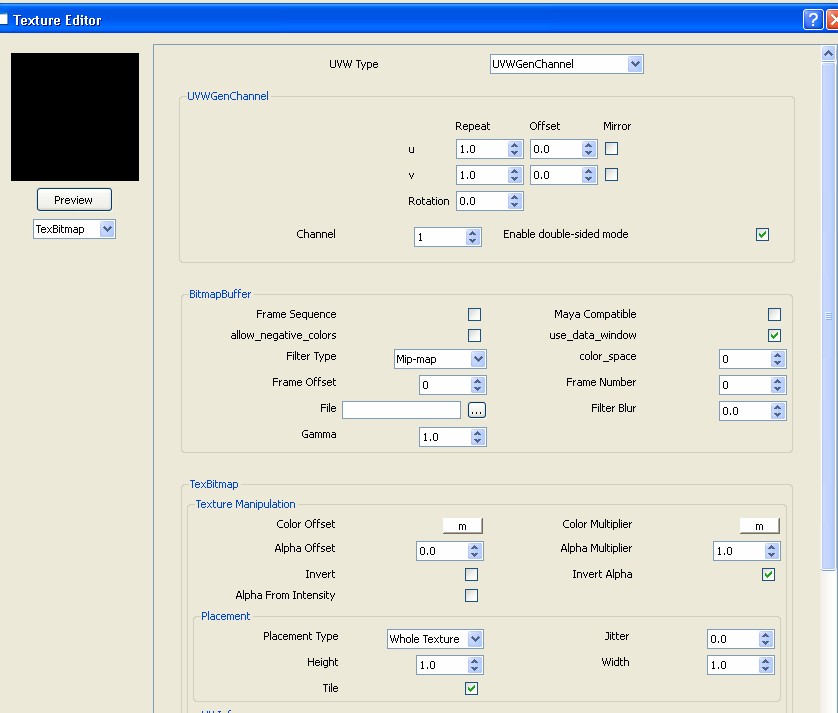
9. Texture Bitmap Properties
Each texture bitmaps have different properties. Below is the Window properties of Texbitmap.

10. Loading Bitmap File
To load bitmap file, click the small box on the right of File. (see image below).

Browse the location of the file you want to load and click open.

11. Applying Vray Material
 Although you can apply the material using the VRAY Material Editor, I will not advise this especially with high poly-models - its very very slow. To apply the material, use the native SketchUp paint bucket .
Note: The highlighted material in VRAY material is the same material selected in the Native Sketchup Material Editor once paint bucket is selected.
To apply the material, simply select the faces you want to apply the material.

In the image below the material has been applied. Notice that tiling (repeat of texture) is so obvious. I purpose applied a non-seamless material so as to help you in the very beginning how to manage your bitmap texture.

12. Nomeradona's strategy with SketchUp Materials.
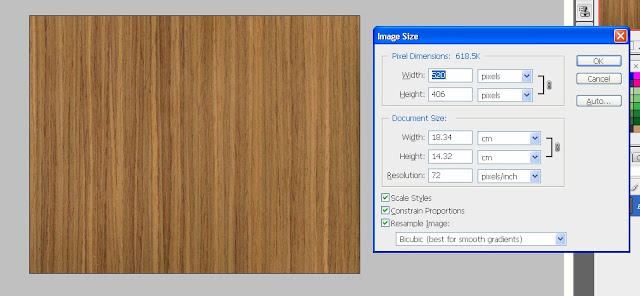
The first thing that one must remember is the texture file size. Using hi-res photos in VRAY SU is a no-no with me, because of two main reasons: I notice that they need much memory, which actually you should allocate during rendering and second I notice that parsing and rendering time is a bit longer.
My first step is finding the balance. I usually re-size my texture to 520px width using Photoshop. You might asked me but how about printing big image.. Printing big image is another issue but you can always use other software on this matter.
The second thing is making the texture seamless in order to avoid obvious tiling.There are lots of software design in creating seamless texture. My favorite is Pixplant and Crazybump. You can also use Photoshop using this quick tutorial.
Step 1: Load the texture

Step 2: Use filter/other/offset
Below is the effect of offset tool. It will shift the edges of original texture both vertically and horizontally.

Step 3: Use Patch tool.
Select the seamed area and drag it to another area.


Step 4: Use Clone stamp tool.
You can also use the clone stamp tool by taking some sample and stamping in on the areas you need to correct.

below shows the corrected texture, the obvious line is gone.

I reloaded the corrected texture in the File tab.

Here is the corrected texture. Tiling is not obvious anymore.

Step 5: Adjusting the texture UV
I normally adjust my texture UV using the native editing of Paint bucket.

13: Region Render.
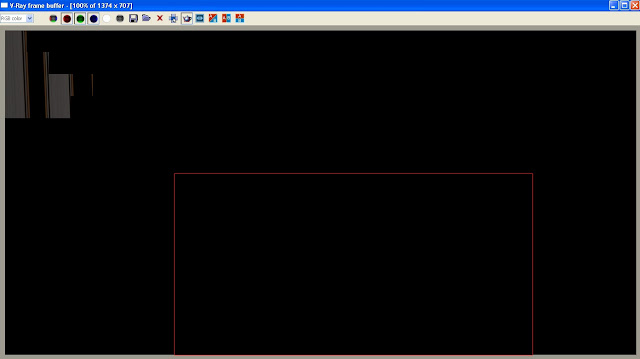
Another good addition with VRAY is the region render. You don't have to render the whole image. I normally use the region render to render the area I want to see. During this stage, I also use the save maps (see Basic VRAY SketchUp tutorial No.2). Click the region render icon and drag to the area you want to render. Then hit render.
14. Mirror Material
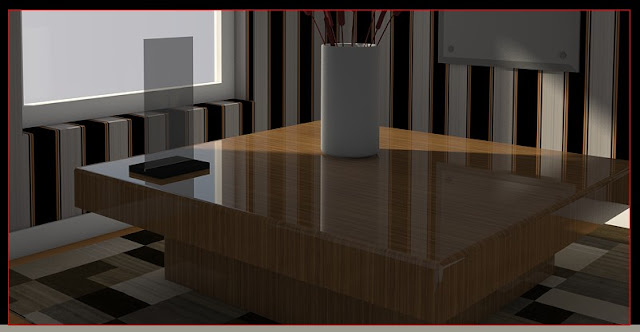
The screen grab below shows the finished render. But wait what happen to the wood material we applied on the table. This one looks like mirror.

Well it's look like a mirror because in the Reflection Layer, there is no map loaded. Notice the 'm'.
Be aware that if there is no Map type loaded in the reflection layer, VRAY will read the reflection as 100% reflective. So any material you put in the diffuse layer, the reflection layer will disregard it.
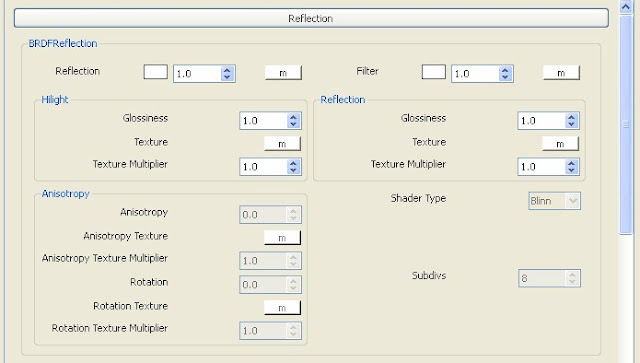
15. Fresnel Map Type in the reflection layer
Now let us load fresnel map in the reflection layer. Click the 'm' box beside reflection. Under the map type select the TexFresnel.
Here is the TexFresnel properties window. For the moment click ok.

Here is the finished render using the render region. Ohh it looks like plastic.
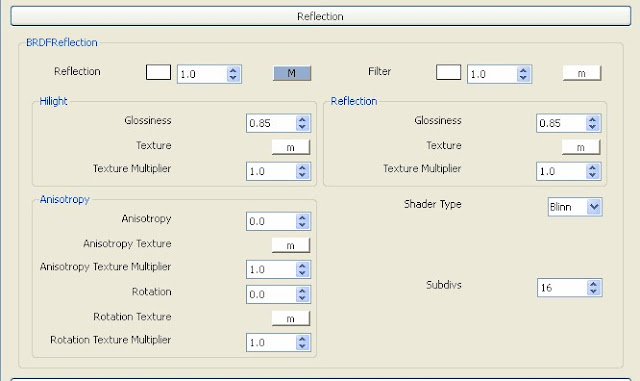
16. Blurry Reflection
In order to create blurry reflection, we need to lower both highlight and reflection glossiness to 0.85 and adjust the Subdivision to 16.
Here is the finished render using the render region.

Bonus...
Download the materials I did. We will use these later.
Diffuse map

Displacement/bump map

Specular map.

Finished render during this stage

If you missed the previous segment be sure to read them first.
Basic VRAY SketchUp Tutorial Series 1
Basic VRAY SketchUp Tutorial Series 2
Ok let's start!
1. The VRAY Material Editor
The icon for the material editor is the firs one "M".
2. Adding keyboard shortcut
I love putting my shortcuts in SketchUp. I also assigned "m" for my VRAY material editor. If you want to create your own keyboard shortcuts, go to system preference. (see image below). This is a very good time saver. Once the shortcut has been assigned, you can automatically open the VRAY Material editor using the keyboard shortcut (in my case, I assigned "m").

Creating New VRAY Standard Material
If you apply the material in SketchUp, VRAY will automatically create a VRAY material. You can also create and load vismat materials. In this segment let me concentrate in doing a new "standard" material (other materials will be tackled in other tutorials). To create a VRAY Standard material, all you need is to highlight "Scene Material" then right click mouse (another tab will appear). Highlight create and again you will have 5 different types of materials (angle blend, SKp two sided, standard, toon and two sided). Click Standard.

Once standard material was clicked, this new material will be created. You will notice Vray will stack in the very last and name it "Default Material". This default material will have three properties (diffuse, options and maps)

3. Renaming your VRAY Material
Renaming material is pretty simple. Highlight the material you want to rename and right click mouse. Click rename material and type the desired name.
Note: Using the same approach, you can save, pack, duplicate, remove, import, apply or even select all objects that use the material.

4. VRAY Layers
Each VRAY MATERIAL does not only have properties, but can have also different layers. Vray layers are like stacks of paper or transparencies on top of each other. This understanding must be noted as early as possible. The reflection layer is like a varnish that you apply on top of the stacks. You can apply as many layers as you wish. In this tutorial, I wont talk about UV and I want to do a separate tutorial just for this subject.

5. Creating VRAY Layers.
To create Vray Layer, you need to highlight the material you want to add layer. Right Mouse click then highlight create layer. Four layer types (emissive, reflection, diffuse and refraction) can be selected.

The Reflection Layer

Refraction Layer


Emisive Layer (self emitting layer material)


6. Removing Layer
To remove layer, all you have to do is to highlight the layer, right click mouse and select Remove Layer.

You can also add as many layers as you want. For advance materials, usually you can play with two different reflection materials, or two different diffuse materials. You can also change the position of this layer by moving the layer above or below the stacks.

7. Adding/loading Maps
Once you see a small "m"in any box, this indicates that you can load a texture map here. If a capital "M" is showing in this box, this means a texture map of any type is applied. To apply or load a texture map, simply click the small 'm'. In the particular example below, I clicked the "m" in the diffuse layer. Once clicked, a new tab will appear. The small square window is the preview window. This is a very useful tool to preview the material. Under it is a small scroll window where you can load the different texture map types. On the right is the property window that display the different properties that can affect this texture map.

8. Texture Map Types
There are different map types that you can load here: TexAColor, TexBitmap, Texblend etc. Let us use the the common one the "TexBitmap".
Note: All other Map types are procedural maps except the TexBitmap

9. Texture Bitmap Properties
Each texture bitmaps have different properties. Below is the Window properties of Texbitmap.
10. Loading Bitmap File
To load bitmap file, click the small box on the right of File. (see image below).

Browse the location of the file you want to load and click open.

11. Applying Vray Material
Although you can apply the material using the VRAY Material Editor, I will not advise this especially with high poly-models - its very very slow. To apply the material, use the native SketchUp paint bucket .Note: The highlighted material in VRAY material is the same material selected in the Native Sketchup Material Editor once paint bucket is selected.
To apply the material, simply select the faces you want to apply the material.

In the image below the material has been applied. Notice that tiling (repeat of texture) is so obvious. I purpose applied a non-seamless material so as to help you in the very beginning how to manage your bitmap texture.

12. Nomeradona's strategy with SketchUp Materials.
The first thing that one must remember is the texture file size. Using hi-res photos in VRAY SU is a no-no with me, because of two main reasons: I notice that they need much memory, which actually you should allocate during rendering and second I notice that parsing and rendering time is a bit longer.
My first step is finding the balance. I usually re-size my texture to 520px width using Photoshop. You might asked me but how about printing big image.. Printing big image is another issue but you can always use other software on this matter.

The second thing is making the texture seamless in order to avoid obvious tiling.There are lots of software design in creating seamless texture. My favorite is Pixplant and Crazybump. You can also use Photoshop using this quick tutorial.
Step 1: Load the texture

Step 2: Use filter/other/offset
Below is the effect of offset tool. It will shift the edges of original texture both vertically and horizontally.

Step 3: Use Patch tool.
Select the seamed area and drag it to another area.

Step 4: Use Clone stamp tool.
You can also use the clone stamp tool by taking some sample and stamping in on the areas you need to correct.

below shows the corrected texture, the obvious line is gone.

I reloaded the corrected texture in the File tab.

Here is the corrected texture. Tiling is not obvious anymore.

Step 5: Adjusting the texture UV
I normally adjust my texture UV using the native editing of Paint bucket.

13: Region Render.
Another good addition with VRAY is the region render. You don't have to render the whole image. I normally use the region render to render the area I want to see. During this stage, I also use the save maps (see Basic VRAY SketchUp tutorial No.2). Click the region render icon and drag to the area you want to render. Then hit render.

14. Mirror Material
The screen grab below shows the finished render. But wait what happen to the wood material we applied on the table. This one looks like mirror.

Well it's look like a mirror because in the Reflection Layer, there is no map loaded. Notice the 'm'.
Be aware that if there is no Map type loaded in the reflection layer, VRAY will read the reflection as 100% reflective. So any material you put in the diffuse layer, the reflection layer will disregard it.

15. Fresnel Map Type in the reflection layer
Now let us load fresnel map in the reflection layer. Click the 'm' box beside reflection. Under the map type select the TexFresnel.

Here is the TexFresnel properties window. For the moment click ok.

Here is the finished render using the render region. Ohh it looks like plastic.

16. Blurry Reflection
In order to create blurry reflection, we need to lower both highlight and reflection glossiness to 0.85 and adjust the Subdivision to 16.

Here is the finished render using the render region.

Bonus...
Download the materials I did. We will use these later.
Diffuse map

Displacement/bump map

Specular map.

Finished render during this stage

Wao! Nice One Sir
ReplyDeleteNomeradona Sketchup Vr: Basic Vray Sketchup Tutorial Series 3 >>>>> Download Now
Delete>>>>> Download Full
Nomeradona Sketchup Vr: Basic Vray Sketchup Tutorial Series 3 >>>>> Download LINK
>>>>> Download Now
Nomeradona Sketchup Vr: Basic Vray Sketchup Tutorial Series 3 >>>>> Download Full
>>>>> Download LINK Ar
Nomeradona Sketchup Vr: Basic Vray Sketchup Tutorial Series 3 >>>>> Download Now
Delete>>>>> Download Full
Nomeradona Sketchup Vr: Basic Vray Sketchup Tutorial Series 3 >>>>> Download LINK
>>>>> Download Now
Nomeradona Sketchup Vr: Basic Vray Sketchup Tutorial Series 3 >>>>> Download Full
>>>>> Download LINK OK
GREAT tutorial sir, this is a basic concept i believe most of us should understand 100%. thanks for the share
ReplyDeleteSalamat sir!!! Great tutorials for beginners like me... I remember, i requested to you thisstep by step tutorial in visopt settings in facebook if u remember eheh,,,and finally here it is :) ...thanks for sharing master ... Hope to see more tutorials soon!!
ReplyDeletei love this blog... thanks a lot mr. Nomeradona .
ReplyDeletesir di ko marender ung table. white ung lumalabas pag nirerender ko sya. pero sa sketch up meron nmn material na naka apply eh. salamat sir nomer...!
ReplyDeletewaiting for ur tutiril 4
ReplyDeleteNomeradona Sketchup Vr: Basic Vray Sketchup Tutorial Series 3 >>>>> Download Now
ReplyDelete>>>>> Download Full
Nomeradona Sketchup Vr: Basic Vray Sketchup Tutorial Series 3 >>>>> Download LINK
>>>>> Download Now
Nomeradona Sketchup Vr: Basic Vray Sketchup Tutorial Series 3 >>>>> Download Full
>>>>> Download LINK
Nomeradona Sketchup Vr: Basic Vray Sketchup Tutorial Series 3 >>>>> Download Now
ReplyDelete>>>>> Download Full
Nomeradona Sketchup Vr: Basic Vray Sketchup Tutorial Series 3 >>>>> Download LINK
>>>>> Download Now
Nomeradona Sketchup Vr: Basic Vray Sketchup Tutorial Series 3 >>>>> Download Full
>>>>> Download LINK Z9